With the recent improvements to handling scalability to your Node.js applications and also seeing more tips on how best we can yield optimizations to database queries, we still have more magic yet to be found. You are probably here because you take database query optimizations seriously and the minimum impact it will give your database performance if treated with importance.
Obviously, we could scale our database by either indexing, sharding (horizontally or vertically), and even something more complex. But with little things, like pagination, using Promise.all for more than one query goes a long way to get resources faster. There is one more: using a Bloom filter.
In this article, we will discuss this data structure by Burton Howard Bloom which creates a set of hashed records, and a resource is checked in the set whether it is a member or not. This trick avoids you going to the database instead for the second time to check if the resource exists or not again.
Introduction to Bloom filters
Let us use a scenario to explain what and how Bloom filters work. Supposing we have a bookstore in a school or shop where students can come in to request a book from the attendant. The attendant has to go round the bookshelves to find the required book. We are thinking of a large bookstore here with a thousand books. The attendant does his job by going to get the book, but what if they don't find the book? Even if they find the book, is this not a waste of time for both the attendant and the student? If we bring this scenario into our application, we could have a bottleneck on the database.
Ideally, we could have a list of all the books in a memory location (probably a list) on the attendant's desk. But as the books in the store increase, the list on the desk increases. This is where the Bloom filter comes in.
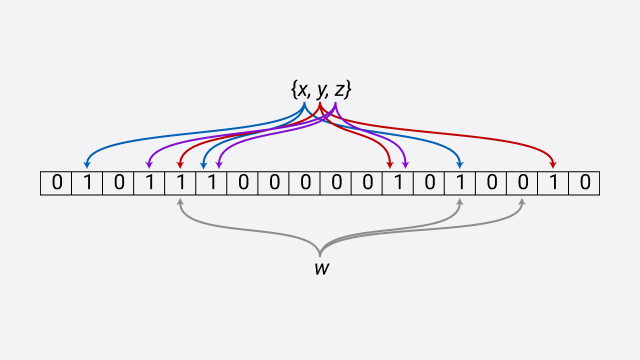
A Bloom is a data structure consisting of an array of N bits. N bits in the sense we can set the number of bits we can have in the array. This data structure is efficient both in time and space complexity as it helps tell you whether an item is present in the set or not. Although, the items added into the set are not added themselves but first hashed, and the result is stored. The mechanism used to hash these items is called the hash function. However, this mechanism doesn't matter to us now but the hash value, the hash value is what we use to mark that position as filled.
This works like hash tables, but the difference is that the hashed value is stored. This makes the Bloom filter more efficient because it is space-efficient. Another important thing to note is that the hash function should be deterministic, meaning that an item passed into the hash function repeatedly should return the same value always.
Setup and Implementation
We are going to implement a basic Bloom filter in our Node.js application. This is will basically enable us to see if a record exists in the database without even querying it.
Ideally, we would want to use an npm package like bloom-redis but let's do something from scratch in order to get a good understanding of how this works.
First, we set our project with yarn init -y and install our dependencies:
$ yarn add express pg redis dotenvYou can use nodemon if you want to watch your file for changes.
Create a server.js file. This will house all our code for this operation:
const express = require('express');
const pg = require('pg');
const dotenv = require('dotenv');
const bloomFilter = redis.createClient();
dotenv.config();

const pool = new pg.Pool({
    host: process.env.DB_HOST,
    port: process.env.DB_PORT,
    user: process.env.DB_USER,
    database: process.env.DB_NAME,
    password: process.env.DB_PASS,
});

const app = express();

// parse json request body
app.use(express.json());

const port = process.env.PORT || 5000;
app.listen(port, () => {
    console.log(`Server on port ${port}`);
});
Our server will be running on a port defined or 5000. The next step is to define our hash function. Remember, our hash function is that mechanism that will return a key from an input. It is this key that we will set in our Bloom filter.
// Hash function
String.prototype.hashCode = function () {
    let hash = 0;
    for (let i = 0; i < this.length; i++) {
        const char = this.charCodeAt(i);
        hash = (hash << 5) - hash + char;
        hash = hash & hash; // Convert to 32bit integer
    }
    return hash;
};
The next step is to create two routes: query a student's record from the database and save a student's record from the database. The first route we will look at is the POST, which saves the record, but before it saves the record, we have to save it in the Bloom filter.
// Insert student details
app.post('/create', async (req, res) => {
    const { name, email } = req.body;
    try {
        await bloomFilter.connect();

        const query = `
            INSERT INTO students (name, email)
            VALUES ($1, $2)
            RETURNING id
        `;
        const result = await pool.query(query, [name, email]);

        if (!result) {
            throw new Error('Unabe to add student record');
        } else {
            const key = email.hashCode();
            bloomFilter.set(key, 1);
            return res.send({ message: 'Student record saved' });
        }
    } catch (error) {
        return res.send({ error });
    }
});
In the above code, we insert the name and email into the database, pass the email into the hash function and save the key in the bloom filter. Yeah, that's just it.
Our next route is the cool part. Querying the database is disallowed first:
// Get student details by email
app.get('/:email', async (req, res) => {
    try {
        await bloomFilter.connect();

        const { email } = req.params;

        const query = `
            SELECT * FROM students WHERE email = $1
        `;

        const key = email.hashCode();
        const exists = await bloomFilter.exists(key);
        if (!exists) {
            return res.send('Student does not exist');
        }

        pool.query(query, [email], (err, response) => {
            if (err) res.send(err);
            return res.send(response);
        });
    } catch (error) {
        return res.send({ error });
    }
});
What did we do above? We pass the email into the hash function to get the same hashed value/key. Then bloomFilter.exists(key) checks if the key exists in the Bloom filter; if it doesn't, the student doesn't exist. If it exists, we then make a trip to the database and fetch the record.
This is a simple scenario where we can reduce database queries. There are more reasons to use a Bloom filter, but this simple implementation was to give you a basic overview.
More reasons to use Bloom filters
The most common use case for using a Bloom Filter is to check if an element is present in a data set which gives two very noticeable answers. 'Is the element in the set' or 'The element might not be in the set'. This certainly might not make sense until you have a very large database where you are more likely to get a negative result than a positive result. In this case, your Bloom filter will do the returning of the 'does not exist' or 'not found' result.
Another use case that might not be the best application is what happens in Gmail or Yahoo. When you send an email to one or more recipients, the browser quickly checks the Bloom filter to see if the emails exist and have been used by you before. This is better than making a server request instead to check if the email exists.
Facebook, LinkedIn and a few social media use Bloom filter for their type-ahead search. Each user has a Bloom filter of his friends and also friends of his friends. LinkedIn created an open-source library called Cleo for this feature.
Drawbacks of Bloom filters
The major drawback of the Bloom filter is that it does not support deletion. In the case where a record in the database is deleted but still exists in the Bloom filter, there is no way to delete the key. There are actually answers to this drawback, but that is going to be a little difficult - you may want to read up a solution in this Deleteable Bloom filter paper.
Another drawback is that it returns false positives meaning that you can't trust it when it says an element exists. And the more data in the set we add, the bigger the false-positive rates we get. For example, we want to find a student's record, checking the bloom filter, and it says it exists, and once we query the database for the record, it does not actually exist. Well, this happens when there is a collision. Clearly, the collision is a result of two students' data that got hashed and returned the same hash value. The solution to this is to add more hash functions to your application. So, if possible, three hash functions would return different values, and we keep them in the bloom filter.
Conclusion
To recap, Bloom filters help check whether an element exists or not, and its two main advantages are time efficiency, which takes constant time to add or find an element in the set, and space efficiency as it stores the elements in bits.
Bloom filters are loved because they will never say an element exists when it doesn't really exist (no false negative), and also, they might say that element exists when it doesn't really exist (false positive). The false positive is a result of a collision from the hash function. This is a risk that is obvious, but its other advantages like space and time efficiency are praised for it.
