Storybook is a web based UI development environment for components. With it, you can visualize different states of UI components and develop them interactively.
Storybook runs outside of your app. So you can develop UI components in isolation without worrying about app-specific dependencies and requirements.
Storybook started as a tool for React components, but the most recent versions have added support for Vue, Angular and Polymer components. For this tutorial, we are going to use React components.
Initial Setup
If you already have a working setup of Storybook in your project, you can skip this section and follow the next one.
Let's start with initializing our project by adding the react and react-dom dependencies.
$ yarn init -y
$ yarn add -D react react-dom
// or
$ npm init -y
$ npm install -D react react-dom
Then we choose to install Storybook using their official CLI, which auto detects what view library your project is using. So, if your project would be using Vue components, for example, the CLI would install the required Storybook dependencies for Vue. In our case, it will use the React dependencies.
$ npx sb initThere is also a more detailed guide on how to set up Storybook manually, for a more customized configuration.
By default, the Storybook generator outputs a sample story file with a couple of demo components. You can use those for a quick overview, but for this tutorial, we are going to add a couple of custom components with simulated random changes and their respective stories:
storiesOf('Button', module)
    .add('as button', () => <Button>Hello Button</Button>)
    .add('as link', () => <Button href="https://www.viswiz.io">Hello Link</Button>)
    .add('button with emoji', () => <Button>😀 😎 👍 💯</Button>)
.add('disabled', () => <Button disabled={true}>Disabled Button</Button>);storiesOf('TextInput', module)
.add('default', () => <TextInput placeholder="Placeholder text" />)
.add('with value', () => <TextInput value="Lorem ipsum" />)
.add('error state', () => <TextInput hasError={true} value="Lorem ipsum" />)
.add('disabled', () => <TextInput disabled={true} value="Lorem ipsum" />);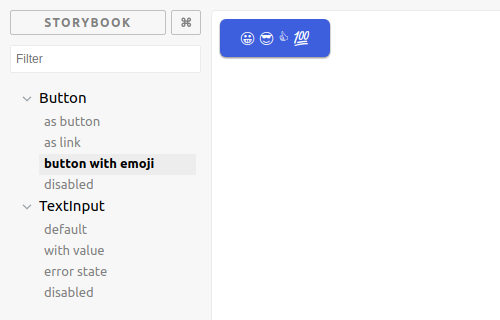
📷 Capture components screenshots
To add visual regression testing, we need to capture screenshots of all our components stories in Storybook. We can use the Storybook addon storycap, which runs all the stories inside Puppeteer (headless Chrome) and captures their screenshots.
First, we install the package in our project:
$ yarn add -D storycap
// or
$ npm install -D storycap
Then, we register the addon in the .storybook/main.js configuration file:
module.exports = {
    addons: [
        // other addons here
        'storycap',
    ],
    // other config here
};
Lastly, we configure Storybook in .storybook/preview.js to wrap all our stories with the two decorators from the addon:
import { addDecorator } from '@storybook/react';
import { withScreenshot } from 'storycap';

addDecorator(withScreenshot);

// other config here
Using this configuration will take a screenshot of all your stories. If you want to have more control over which stories get screenshots please read the storycap documentation.
We can now try it out and get screenshots of all our components stories:
$ storycap --serverCmd 'start-storybook -p 9001 --ci'
info Wait for connecting storybook server http://localhost:9001.
info Storycap runs with managed mode
info Found 8 stories.
info Screenshot stored: __screenshots__/Button/as link.png in 490 msec.
info Screenshot stored: __screenshots__/Button/disabled.png in 509 msec.
info Screenshot stored: __screenshots__/Button/as button.png in 645 msec.
info Screenshot stored: __screenshots__/Button/button with emoji.png in 646 msec.
info Screenshot stored: __screenshots__/TextInput/default.png in 154 msec.
info Screenshot stored: __screenshots__/TextInput/with value.png in 166 msec.
info Screenshot stored: __screenshots__/TextInput/disabled.png in 130 msec.
info Screenshot stored: __screenshots__/TextInput/error state.png in 134 msec.
info Screenshot was ended successfully in 9885 msec capturing 8 PNGs.
✨ Visual Regression Testing with VisWiz.io
To add visual regression testing with VisWiz.io for our components, we want to send the build information and screenshots to the VisWiz.io API, with our SDK & CLI package:
$ yarn add -D viswiz-sdk
// or
$ npm install -D viswiz-sdk
Then we add both the screenshot addon and VisWiz.io CLI to the test script:
"test": "storycap --serverCmd 'start-storybook -p 9001 --ci' && viswiz build --image-dir ./__screenshots__"For the final integration of VisWiz.io in our tests, we need to have the following environment variables available when we run the viswiz CLI: VISWIZ_API_KEY and VISWIZ_PROJECT_ID. You can export these to your terminal shell while developing, but you will need to define these in your CI system (please refer to your CI documentation on how to define environment variables).
To get your API key and project ID, follow our Getting Started guide.
💯 Visual Regression Results
If we want to run the test locally, we'll need to pass more arguments to the viswiz command (like the commit revision, commit message and branch name). If we run this test on popular CI services (e.g., Travis, CodeShip, AppVeyor, etc.), these values are auto-detected.
When we run the tests now on CI, we will send the images results from your tests to our VisWiz.io service for regression testing.
$ yarn test
$ storycap --serverCmd 'start-storybook -p 9001 --ci' && viswiz build --image-dir ./__screenshots__
info Wait for connecting storybook server http://localhost:9001.
info Storycap runs with managed mode
info Found 8 stories.
info Screenshot stored: __screenshots__/Button/as link.png in 490 msec.
info Screenshot stored: __screenshots__/Button/disabled.png in 509 msec.
info Screenshot stored: __screenshots__/Button/as button.png in 645 msec.
info Screenshot stored: __screenshots__/Button/button with emoji.png in 646 msec.
info Screenshot stored: __screenshots__/TextInput/default.png in 154 msec.
info Screenshot stored: __screenshots__/TextInput/with value.png in 166 msec.
info Screenshot stored: __screenshots__/TextInput/disabled.png in 130 msec.
info Screenshot stored: __screenshots__/TextInput/error state.png in 134 msec.
info Screenshot was ended successfully in 9885 msec capturing 8 PNGs.

Creating build on VisWiz.io...
Done!
Please note that the initial build created on VisWiz.io will not have any baseline to compare itself to, so there will be no regression report generated for it. However, all builds created after that one will generate visual regression reports like this one:
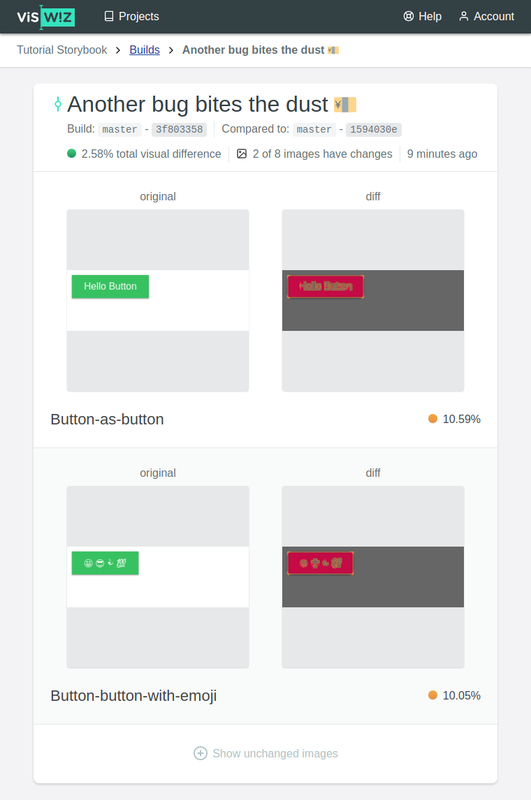
After running the tests, open your Projects page, choose your project and open your last build to see the report for it.
🚀 Go Test Your Components!
By default, the screenshot addon takes screenshots of the stories in a 800x600 viewport. You can customize the size of the viewport or even choose multiple viewports using the addon's API. This will enable you to test your application in a variety of viewports to validate your components' responsiveness.
You can also follow this tutorial with the actual code, commit by commit, on our tutorial repository: github.com/viswiz-io/viswiz-tutorial-storybook.
Congratulations! You are now ready to start visually testing your UI components with VisWiz.io! 🎉
📝 Note: This tutorial was first published in the Help section of VisWiz.io.
The tutorial was updated on October 30th, 2020 with the configuration required for the most recent packages,
storybookv6 andstorycapv3.
